


Developing a REST API in Python and Flask Using Cursor Editor and AI
A Beginner’s Guide
-

- •

Introduction
REST APIs are essential for modern web applications, enabling seamless communication between frontend and backend services. Building them from scratch can be time-consuming, but with the right tools, we can streamline the process. This is where Cursor Editor comes in.
Cursor is a code editor similar to VS Code but with powerful AI capabilities built-in. It helps developers write code faster, understand complex concepts, and solve problems more efficiently. In this tutorial, we’ll leverage these AI features to build our API with minimal manual coding.
This post will guide you through building a functional REST API using Python, Flask, and the Cursor Editor with AI assistance. Our API will support basic operations for searching and reading from a CSV file task list. We’ll see how Cursor’s AI features can significantly speed up development by generating code, explaining concepts, debugging, and suggesting improvements.
Project Setup
Prerequisites
Before we begin, make sure you have the following installed:
- Python (3.7 or higher)
- Cursor Editor (free version is sufficient for this tutorial)
- Postman (for testing the API)
Creating a New Project
- Open Cursor Editor
- Go to File > Open Folder
- Create a new folder on your desktop or preferred location
- Open this folder in Cursor
Setting up virtual environment
- On Mac or Linux:
python3 -m venv .venv
source .venv/bin/activate
2. On Windows
py -m venv .venv
source .venv/Scripts/activate
A virtual environment (venv) is an isolated Python environment that helps you with:
- Project Isolation
- Each project gets its own independent set of Python packages
- Packages installed in one virtual environment don’t interfere with other projects
- You can have different versions of the same package for different projects
2. Dependency Management
- In your case, when you install packages using (pip install -r requirements.txt), Flask and python-dateutil will be installed only in your (.venv) environment
- This prevents conflicts with system-wide Python packages
- Makes it easier to track and manage project-specific dependencies
3. Clean Development
- Prevents polluting your global Python installation
- Makes it easier to recreate the development environment on another machine
- Helps avoid the “it works on my machine” problem
Understanding Cursor’s AI Features
Before we dive into coding, let’s familiarise ourselves with the key AI features of Cursor that we’ll be using:
- Composer (Ctrl+I / Cmd+I): Generates multiple files at once, perfect for scaffolding a new project.
- Chat Window (Ctrl+L / Cmd+L): Context-aware AI chat that can explain code, suggest improvements, and answer questions.
- Inline Editing (Ctrl+K): Make targeted code changes by highlighting code and instructing the AI what to modify.
- Inline Completions: As you type, Cursor suggests completions that you can accept with Tab.
AI works best at solving really small, discrete, detailed tasks. The more specific you can be, the more context and information you give it, the better results you’re going to get.
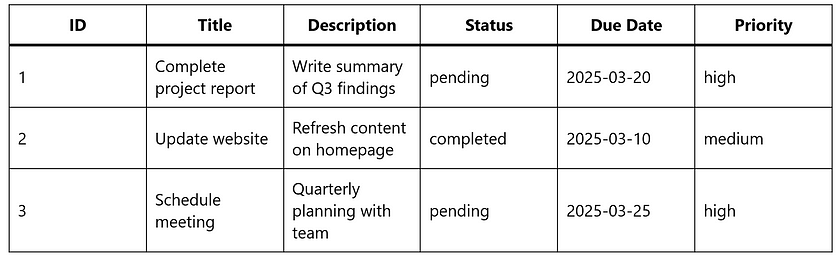
Designing Our CSV Task Structure
For our API, we’ll use a simple CSV file to store task data. Here’s the structure we’ll implement:
Building the API with Cursor’s Help
Step 1: Project Scaffolding with Composer
Let’s use Cursor’s Composer feature to generate our basic Flask application structure.
- Press Ctrl+I (or Cmd+I on Mac) to open the Composer
- Expand the panel to see more and enter the following prompt:
Create a Flask REST API application for managing tasks stored in a CSV file. The API should have:
1. A main app.py file with Flask setup and configuration
2. A tasks.py file for reading and querying the CSV task list
3. Routes for listing all tasks and searching tasks by keyword or status
4. Basic error handling
5. A sample tasks.csv file with at least 5 example tasks
Use the following structure for each task: id, title, description, status, due_date, priority
- Press Enter and wait for Cursor to generate the files
- Review the generated files and click “Accept All” when you’re satisfied
Step 2: Examining and Understanding the Generated Code
Let’s use the Chat feature to understand what Cursor has created for us.
- Press Ctrl+L (or Cmd+L on Mac) to open the Chat window
- Add context by typing app.py and selecting it from the suggestions
- Ask: “Can you explain what this code does and how the API endpoints are structured?”
Step 3: Enhancing the Task Search Functionality
Let’s use the inline editing feature to improve the search functionality.
- In the tasks.py file, locate the search function
- Highlight the function
- Press Ctrl+K
- Enter the prompt: “Enhance this function to allow searching by priority level (high, medium, low) and due date range”
- Review the suggested changes and click “Accept” if satisfied
Step 4: Adding Input Validation
Now let’s add input validation to our API endpoints:
- Open the Chat window with Ctrl+L
- Add context by typing app.py and selecting it
- Ask: “Can you help me add input validation for the search endpoint to ensure valid parameters?”
- Review the code Cursor suggests and click “Apply” to implement it
Testing the API with Postman
Now that our API is ready, let’s test it using Postman:
- Make sure your Flask server is running (with a command like python3 app.py)
- Open Postman
- Create a new request to GET http://localhost:5001/api/tasks to list all tasks
- Create another request to GET http://127.0.0.1:5001/api/tasks?priority=high to search for tasks with priority “high”
- Try other search parameters like status=pending or keyword=bug
If you encounter any issues, use Cursor’s Chat feature to help debug:
- Open Chat with Command / Ctrl+L
- Paste any error messages you’re seeing
- Ask: “What might be causing this error and how can I fix it?”
Conclusion
In this tutorial, we’ve built a functional REST API using Python and Flask with minimal manual coding. Cursor Editor’s AI features helped us in several ways:
- Code Generation: We used Composer to scaffold our entire project
- Understanding Code: The Chat feature explained the code structure
- Enhancing Functionality: We improved our search feature with inline editing
- Debugging: Any issues were quickly resolved with AI assistance
This approach to development can significantly increase your productivity, especially when working with new frameworks or technologies. Cursor’s AI capabilities allow you to focus on the architecture and design while offloading repetitive coding tasks.
What’s next? You could extend this API by adding write operations (POST, PUT, DELETE), implementing authentication, or connecting to a database instead of a CSV file. And with Cursor’s AI features, these enhancements can be implemented quickly and efficiently.
References
- Cursor Tutorial for Beginners (AI Code Editor). https://www.youtube.com/watch?v=ocMOZpuAMw4
Catch the latest version of this article over on Medium.com. Hit the button below to join our readers there.


