

LLava: Advancing Image Recognition with Enhanced AI Models
Everything You Need to Know About LLava Models
-
- •

Introduction
LLava, also known as the Large Language and Vision Assistant, is a large language model (LLM) with advanced features that allow it to identify and respond to questions about images. Developed by the University of Wisconsin and Microsoft, LLava has shown remarkable multimodal capabilities, occasionally displaying behaviours similar to those seen in sophisticated models like GPT-4.
This model is intended for a wide range of applications, excelling in tasks that involve both text and visual inputs. Its ability to comprehend and generate responses based on these inputs makes it particularly useful for scenarios that demand a deep understanding of visual content, such as answering image-related questions or interpreting visual data within a conversation.
Get started with LLava
If you need to install LLava on your device, you can do so using Ollama. Follow these steps for a step-by-step installation:
Step 1: Check the Hardware Requirements
Based on the information on Ollama Github, you should have at least 8 GB of RAM available to run LLava 7B models and 16 GB to run LLava 13B models.
Step 2: Install Ollama on Your Local systems
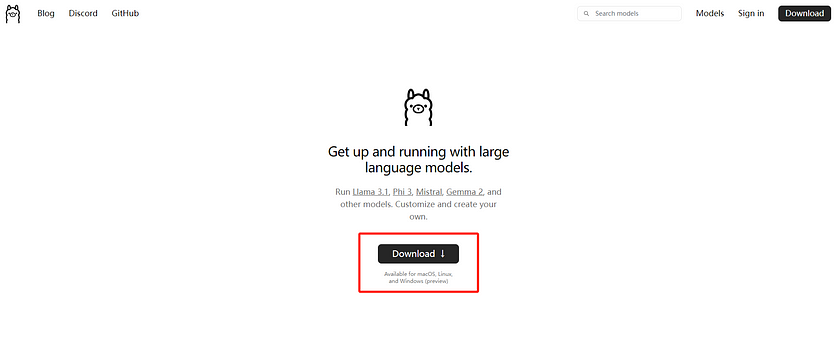
Go to the Ollama homepage to install Ollama based on the systems you use.
Step 3: Install LLava Models
Once Ollama is successfully installed on your local system, run the commands below in the terminal. If you have already downloaded LLava 7B or LLava 13B, the model will run immediately. If not, it will first download the required files and then execute the model for you.
Install and run LLava 7B:
ollama run llavaIntall and run LLava 13B:
ollama run llava:13bAfter completing the steps above, you should see the model running in the terminal. Then, you are all set!

However, we typically don’t use LLava models directly in the terminal because uploading images can be cumbersome in that environment. Instead, I’ll walk you through a brief demo to inspire you on how to effectively use LLava on your system.
Demo: Build your own Photo Classifier
Step 1: Create a Python File
Create a new Python file named app.py in your project folder. We will add the main logic for running LLava models in our Demo.
Step 2: Install Necessary Python Libraries
In this demo, we will use PIL and ollama these two Python libraries. If you haven’t installed them on your systems, you can run the commands below to install them:
Install PIL library:
pip install PillowInstall ollama library:
pip install ollamaStep 3: Write the Application Logic
In the app.py file, import the Image class from the PIL library and the ollama library into your project. Then, outline the basic structure of our function. You can change the model you want to use by specifying its name in the model='' parameter. For example, you can set model='llava' as an example. The generate_text function will be called each time a user provides an image to the model. The model will then generate a text response based on the provided prompt and image:
from PIL import Image
import ollama

def generate_text(instruction, file_path):
    result = ollama.generate(
        model='',
        prompt=instruction,
        images=[file_path],
        stream=False
    )['response']
    img=Image.open(file_path, mode='r')
    img = img.resize([int(i/1.2) for i in img.size])
    for i in result.split('.'):
        print(i, end='', flush=True)
Step 4: Configure Your Prompt and File Path
Next, you can set the prompt you want the LLava model to base its responses on, as well as specify the path to the image you want the AI model to analyse. Once everything is set up, you can run the model analysis by calling the generate_text function.
instruction = "Your prompt"
file_path = 'The path to your image'
generate_text(instruction, file_path)
Step 5: Build an Example
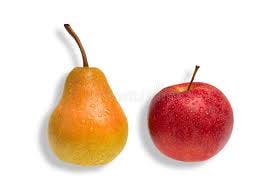
Here’s an example of my code. In this code, I’ve chosen the llava:13b model, and the image I've selected is of some fruit, as shown in the example. The prompt I've provided is, "Please tell me what fruit is on the far right." Here is the code script:
from PIL import Image
import ollama

def generate_text(instruction, file_path):
    result = ollama.generate(
        model='llava:13b',
        prompt=instruction,
        images=[file_path],
        stream=False
    )['response']
    img=Image.open(file_path, mode='r')
    img = img.resize([int(i/1.2) for i in img.size])
    for i in result.split('.'):
        print(i, end='', flush=True)
instruction = "Please tell me what fruit on the far right it is."
file_path = 'The path to your image'
generate_text(instruction, file_path)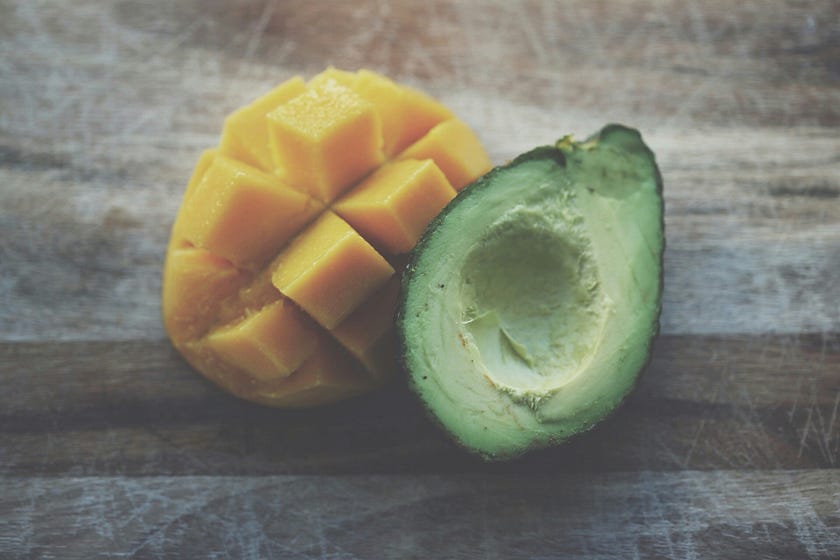
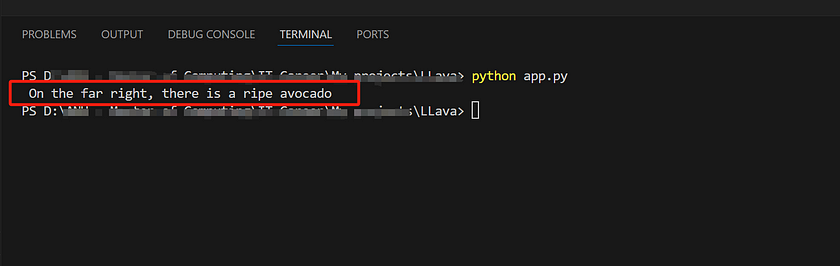
Here’s the result of the text generated by our model based on the provided prompt, which is a highly accurate description.
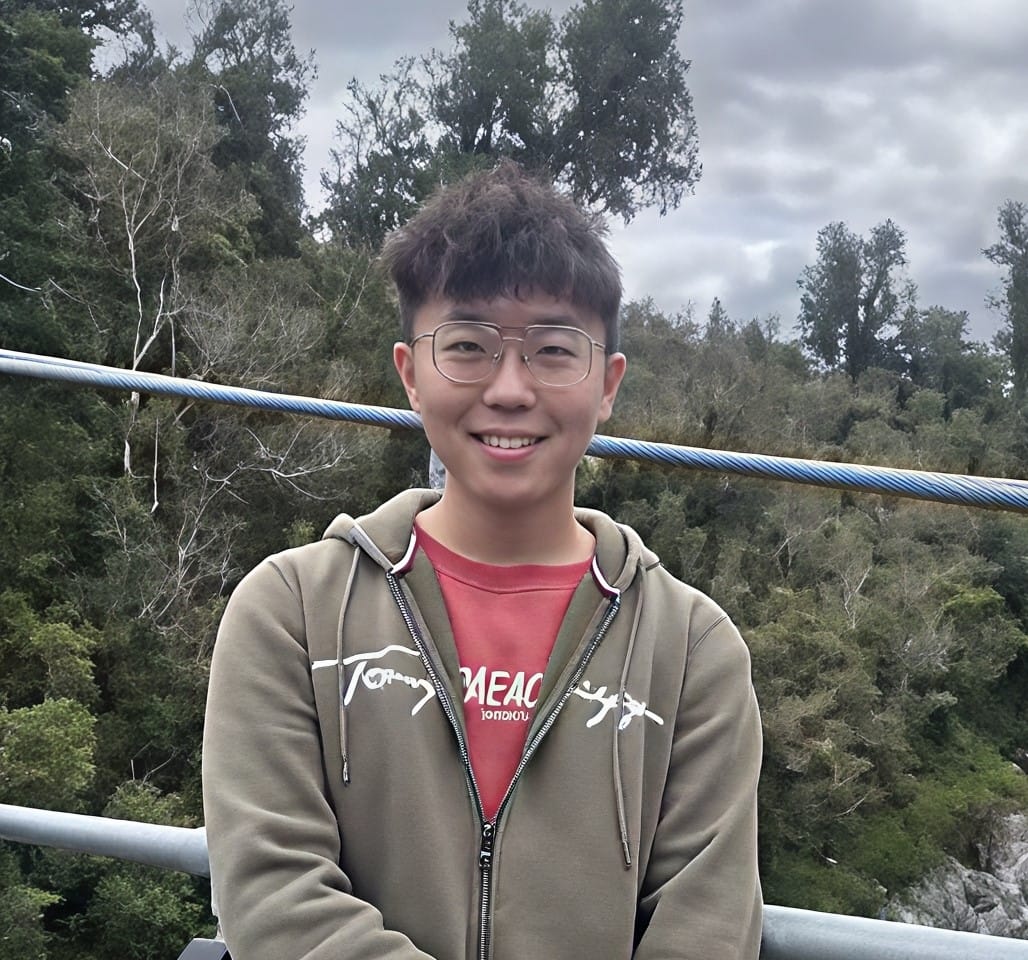
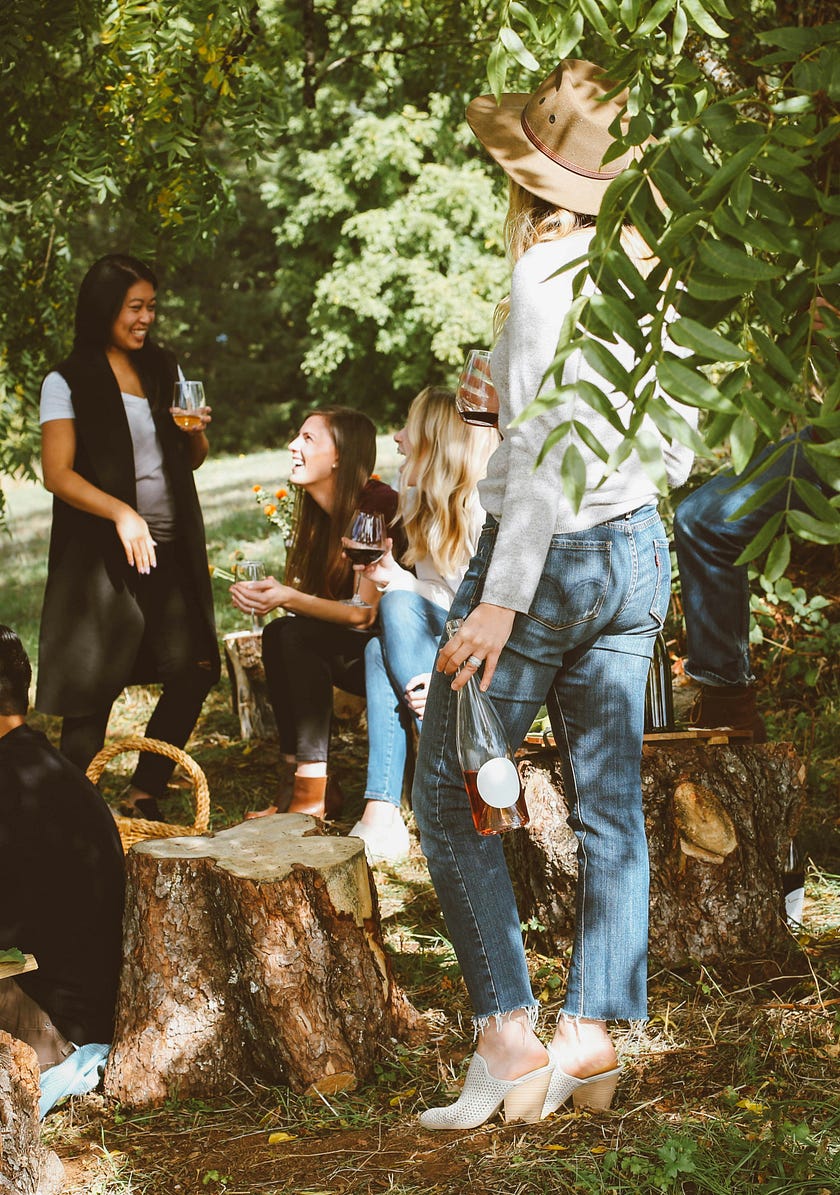
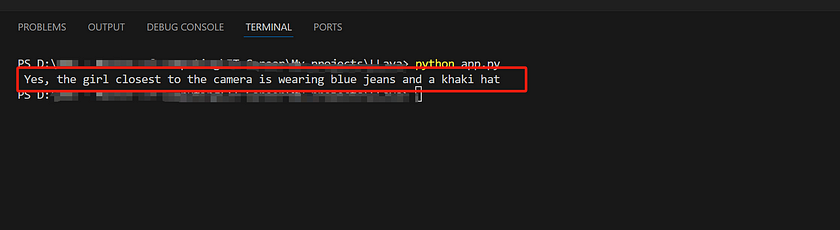
Of course, we can also ask the LLava model Yes or No questions to verify information about the image. This approach can indirectly demonstrate the difference between the model’s understanding of the image and a human’s ability to recognise it. For example, I changed the prompt to, “Is the girl closest to the camera wearing blue jeans and a khaki hat?” Here’s our image:
Even though the image is quite complex, our model still answers the questions correctly. This demonstrates that LLava has a very strong ability to understand and interpret images.
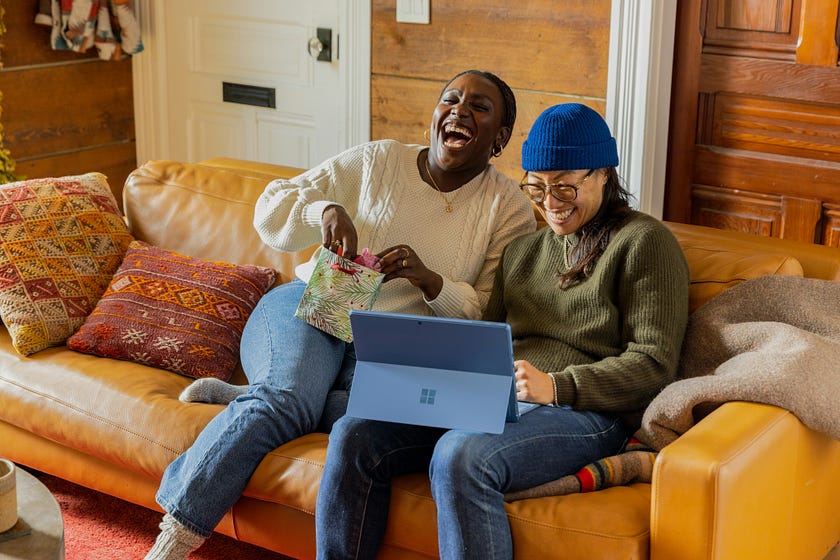
We can also have the model help us categorise images, provided that we give it an appropriate prompt. Here, I’ve modified the prompt to: “Please choose the most suitable label for this image from the following options: Happy, Sad, Neutral. Additionally, it seems like the woman in the image is holding a tablet that appears to be from the Microsoft brand. Could you tell me more about this brand?” Here’s our image:
As always, our model can give the right tag to our image. Here’s the result of LLava 13B model:
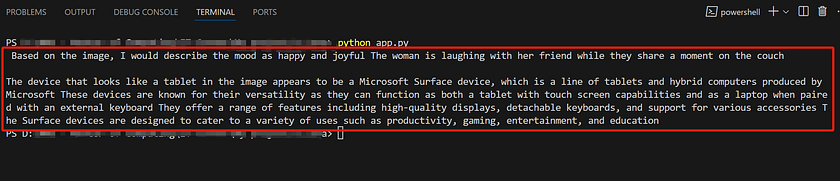
From this, we can see that LLava is not just a vision model capable of recognising image content; it also possesses the natural language processing capabilities of a large language model (LLM). Based on the prompts provided by the user, the model can analyse the image content while responding to the specific prompts. Therefore, this model can be useful in developing photo classifier projects that require tagging and categorising images based on the prompts we provide.
The performance gap between LLava 7B and 13B
Due to the significant difference in hardware requirements between LLava 7B and 13B, with the latter needing much more computational power, we want to explore just how large the performance gap is between LLava 7B and 13B. We aim to determine whether using more powerful hardware for LLava 13B is worth the investment. For this test, we’ll use a very simple image of some fruit, with the prompt remaining the same: “Please tell me what fruit is on the far right.” We will run each model multiple times to observe and compare the results.
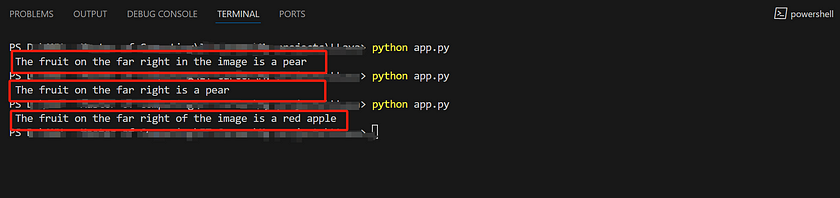
Here are the results from LLava 7B. As you can see, the model’s responses are less than ideal. For such a simple image, not only were the results inconsistent across three attempts, but two of the responses were also incorrect.
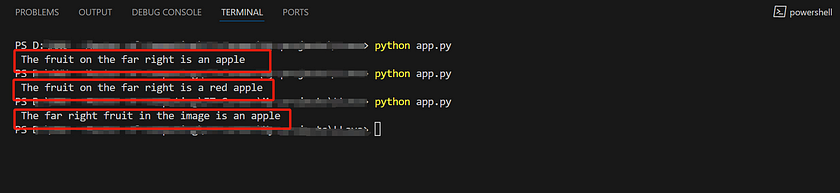
In contrast, the results from the LLava 13B model were much better, with all three attempts producing highly accurate answers.
This shows that LLava 7B does not meet our requirements for high accuracy in image recognition. In our project, if we decide to use the LLava model, it is necessary to opt for LLava 13B, even if it means sacrificing some computational power.
Conclusion
In summary, while both LLava 7B and 13B offer advanced capabilities in image recognition and natural language processing, the LLava 13B model significantly outperforms its smaller counterpart in terms of accuracy and consistency. For projects that demand precise image classification and tagging, the investment in more powerful hardware to run LLava 13B is justified. With the introduction of LLava 1.6, a suite of enhancements further refined the model’s performance, expanded its capabilities, and upheld its efficient and minimalist design. These improvements are crucial for broadening the model’s utility across applications requiring high-resolution visual processing, sophisticated visual reasoning, and enhanced visual conversation interactions.
References
- Ritvik Rastogi. “Papers Explained 107: LLaVA 1.6.” Medium, 1 Mar. 2024. Read me. Accessed on 15 Aug 2024.
- Thomas Reid. “Testing Llava 1.6 versus Llava 1.5.” Medium, 9 Apr. 2024. Read me. Accessed on 15 Aug 2024.
- Ollama Models Webpage — LLava. Read me.
- Alfathterry. “LLaVa via Ollama — Image Annotation.” 24 Apr. 2024. Read me. Accessed on 15 Aug 2024. 5) Ollama Github Webpage. Read me.
Catch the latest version of this article over on Medium.com. Hit the button below to join our readers there.


