


What is Cog?
Working Examples
-

- •

Introduction
Machine learning has revolutionised countless industries, but deploying ML models remains a significant challenge for many data scientists and developers. The process often involves wrestling with complex dependencies, managing environment configurations, and navigating the intricacies of containerisation. Enter Cog, an open-source tool designed to simplify the packaging and deployment of machine learning models. By automating much of the containerisation process and providing a standardised interface for model interaction, Cog aims to bridge the gap between model development and production deployment.
In this article, we’ll explore the capabilities of Cog through practical, working examples. We’ll dive into three key functionalities that make Cog a game-changer in the ML deployment landscape: running predictions on a model, building Docker images, and deploying models to cloud platforms for API-based inference. By the end of this guide, you’ll have a clear understanding of how Cog can streamline your ML workflow, from local development to production-ready deployment. Whether you’re a seasoned ML engineer or just starting your journey in machine learning, Cog offers a powerful toolkit to enhance your model deployment process.
What is Cog
Cog is an open-source tool that simplifies the process of packaging and deploying machine learning models. At its core, Cog provides a standardised way to define the environment, dependencies, and interface for any machine learning model. It achieves this by automating the creation of Docker containers tailored specifically for ML workloads, eliminating much of the complexity traditionally associated with containerisation.
One of Cog’s key strengths lies in its simplicity and flexibility. With just two main configuration files — cog.yaml for defining the environment and dependencies, and predict.py for specifying the model’s interface — developers can quickly containerise their models. Cog handles the intricate details of setting up the correct CUDA versions, managing Python dependencies, and ensuring compatibility between various ML libraries. This approach not only saves time but also reduces the potential for errors in the deployment process.
Furthermore, Cog seamlessly integrates with existing ML workflows and cloud platforms. It generates a standard HTTP API for model inference, facilitates easy scaling through container orchestration platforms, and supports various input and output types common in ML tasks. Whether you’re working with image classification, natural language processing, or any other ML domain, Cog provides a consistent and efficient way to package and deploy your models. This standardisation makes it easier to version, share, and collaborate on ML projects, bridging the gap between model development and production deployment.
Getting Started with Cog
Cog simplifies the process of containerising and deploying machine learning models. This section will guide you through the initial steps of setting up Cog and understanding its core components.
- Install Cog: There are two main ways to install Cog, depending on your operating system — For macOS users:
brew install cogFor Linux users (and as an alternative for macOS):
sudo curl -o /usr/local/bin/cog -L https://github.com/replicate/cog/releases/latest/download/cog_`uname -s`_`uname -m` sudo chmod +x /usr/local/bin/cogEnsure you have Docker installed and running on your machine, as Cog relies on it for containerisation.
2. Project Setup: Let’s create a new directory for our Cog project and initialise it:
mkdir cog-quickstart cd cog-quickstart cog initThe cog init command generates two crucial files: cog.yaml and predict.py. These files form the backbone of your Cog project, defining its environment and prediction interface.

3. Understanding cog.yaml and predict.py:
cog.yaml: This file is the configuration center of your Cog project. It defines the build environment, dependencies, and other settings for your model. Here’s a brief overview:
build:
  python_version: "3.8"
  python_packages:
    - "torch==1.9.0"
    - "transformers==4.11.3"
predict: "predict.py:Predictor"
The build section specifies the Python version and packages required for your model. The predict line points to the file and class that define your model’s prediction interface.
predict.py: This file contains the Python code that defines how predictions are run on your model. It typically includes a Predictor class with two main methods:
from cog import BasePredictor, Input, Path

class Predictor(BasePredictor):
    def setup(self):
        # Load model here
        pass
    def predict(self, input: Input) -> str:
        # Run prediction here
        pass
The setup() method is used for loading your model, while the predict() method runs predictions. These files work together to create a standardised, reproducible environment for your machine learning model. The cog.yaml file ensures that all necessary dependencies are installed in the container, while predict.py provides a consistent interface for running predictions.
Working Example 1: Running Predictions on a Model
In this example, we’ll walk through the process of running predictions on a pre-trained model using Cog. We’ll use a ResNet50 image classifier, which is a popular convolutional neural network for image classification tasks. Let’s break down the process into steps:
- Obtain pre-trained model weights: First, we need to download the pre-trained weights for our ResNet50 model:
WEIGHTS_URL=https://storage.googleapis.com/tensorflow/keras-applications/resnet/resnet50_weights_tf_dim_ordering_tf_kernels.h5 curl -O $WEIGHTS_URL2. This command downloads the pre-trained weights and saves them in your current directory.
3. Configure the model in predict.py: Next, we’ll modify the predict.py file that was generated earlier. We’ll update its contents with the following code:
from typing import Any
from cog import BasePredictor, Input, Path
from tensorflow.keras.applications.resnet50 import ResNet50
from tensorflow.keras.preprocessing import image as keras_image
from tensorflow.keras.applications.resnet50 import preprocess_input, decode_predictions
import numpy as np

class Predictor(BasePredictor):
    def setup(self):
        """Load the model into memory to make running multiple predictions efficient"""
        self.model = ResNet50(weights='resnet50_weights_tf_dim_ordering_tf_kernels.h5')

    def predict(self, image: Path = Input(description="Image to classify")) -> Any:
        """Run a single prediction on the model"""
        # Preprocess the image
        img = keras_image.load_img(image, target_size=(224, 224))
        x = keras_image.img_to_array(img)
        x = np.expand_dims(x, axis=0)
        x = preprocess_input(x)

        # Run the prediction
        preds = self.model.predict(x)

        # Return the top 3 predictions
        return decode_predictions(preds, top=3)[0]
This script defines a Predictor class that loads the ResNet50 model in the setup method and processes images for prediction in the predict method.
4. Set up dependencies in cog.yaml: Update your `cog.yaml` file to include the necessary dependencies:
build:
  python_version: "3.11"
  python_packages:
    - pillow==9.5.0
    - tensorflow==2.12.0
predict: "predict.py:Predictor"
5. Run a local prediction using cog predict: Now that we have our model set up, let’s run a prediction on a sample image:
IMAGE_URL=https://gist.githubusercontent.com/bfirsh/3c2115692682ae260932a67d93fd94a8/raw/56b1024853305c9f6d5d17f90840c4f967b16716/cat.jpg curl $IMAGE_URL > input.jpg cog predict -i image=@input.jpg6. When you execute ‘cog predict’ for the first time, it initiates a build process to create a Docker container capable of running your model. For subsequent ‘cog predict’ commands, this pre-built container will be utilised, eliminating the need for rebuilding.
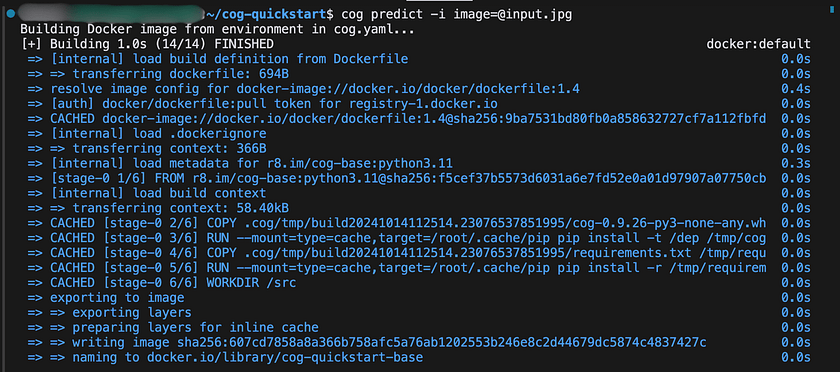
7. Once the Docker container has been successfully built, you can expect to see output similar to the following:
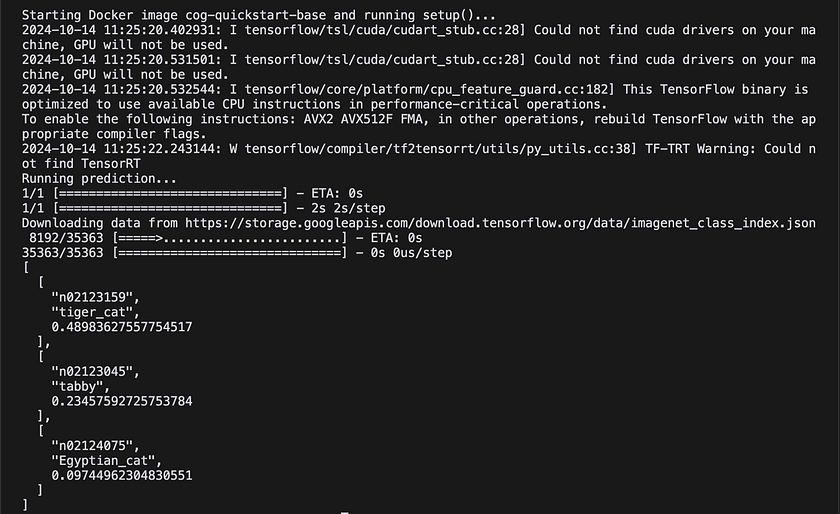
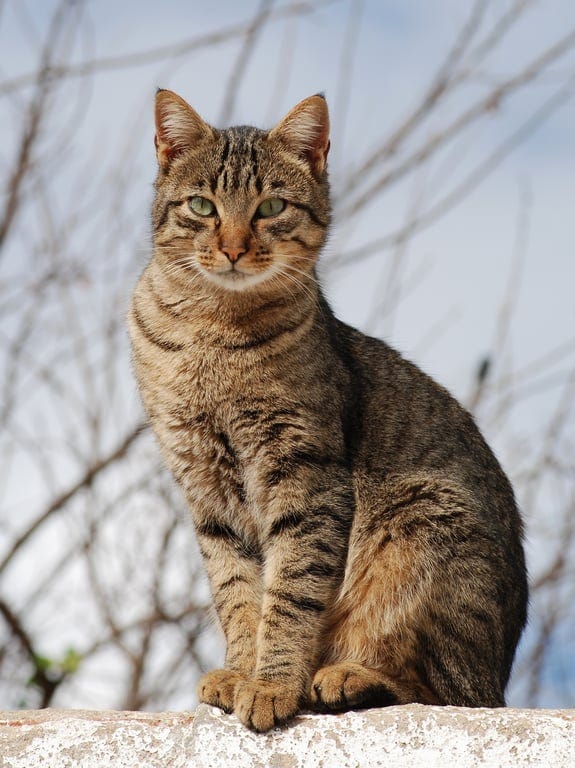
This output shows the top three predictions for the input cat image, along with their confidence scores. By following these steps, we’ve successfully set up a pre-trained ResNet50 model using Cog and run a local prediction. With just a few configuration files and commands, we’ve containerised a complex machine learning model and made it ready for predictions.
Working Example 2: Building a Docker Image
In this example, we’ll explore how to build a Docker image of our model using Cog. This process packages your model’s code, trained weights, and the entire Docker environment into a single image. The resulting image can serve predictions via an HTTP server and can be deployed anywhere Docker runs, enabling real-time predictions.
- Build the Docker image: First, let’s build the Docker image using the cog build command:
cog build -t resnetThis command builds a Docker image and tags it with the name “resnet”. You should see output similar to:

2. Run predictions using the built image: Now that we have our Docker image, we can use it to run predictions in two ways:
a. Using Cog:
cog predict resnet -i image=@input.jpgThis command runs a prediction using the “resnet” image we just built, with “input.jpg” as the input image.
b. Using Docker directly:
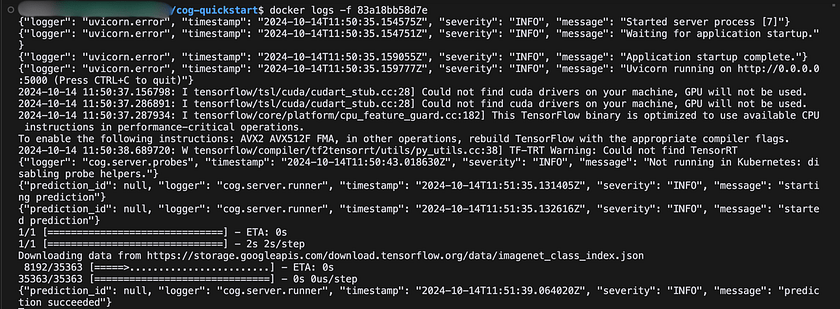
docker run -d --rm -p 5000:5000 resnetThis command initiates the Docker image, making an HTTP server accessible on port 5000. Subsequently, we can observe the container’s logs using Docker’s “docker logs” command, as demonstrated below.
3. Test the HTTP server: With the Docker container running, we can test the HTTP server using python:
import requests
import json

# URL of the prediction endpoint
url = "http://localhost:5000/predictions"

# Headers
headers = {
    'Content-Type': 'application/json'
}

# Data payload
data = {
    "input": {
        "image": "https://gist.githubusercontent.com/bfirsh/3c2115692682ae260932a67d93fd94a8/raw/56b19f53f7643bb6c0b822c410c366c3a6244de2/mystery.jpg"
    }
}

# Make the POST request
response = requests.post(url, headers=headers, data=json.dumps(data))

# Check if the request was successful
if response.status_code == 200:
    # Print the response JSON
    print(json.dumps(response.json(), indent=2))
else:
    print(f"Error: {response.status_code}")
    print(response.text)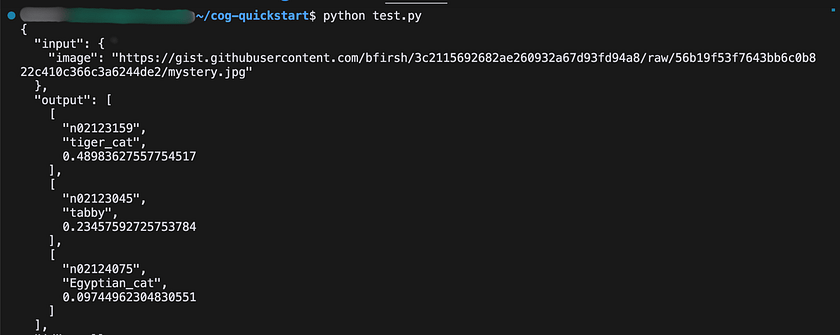
4. Share your image via a registry (Optional): To make your image available to others, consider uploading it to a Docker registry such as Docker Hub or AWS Elastic Container Registry. Once uploaded, the image can be deployed and run on any system that supports Docker
Working Example 3: Integrating with Replicate
This example demonstrates the process of integrating a Diffusers model with Replicate, a platform designed for deploying and scaling machine learning models as APIs. Replicate offers a streamlined approach to hosting your models, version management, and API accessibility. By leveraging Replicate for your model deployment, you can take advantage of benefits like scalable infrastructure, robust versioning capabilities, and seamless integration across various applications.
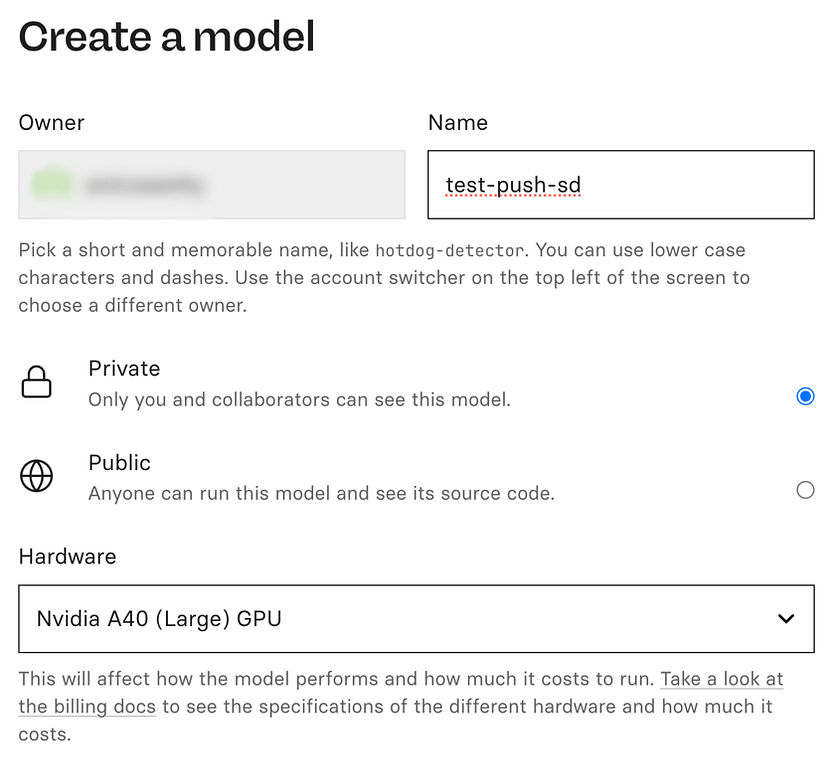
- Initiate a new model on Replicate: Begin by navigating to ‘replicate.com/create’. Here, you’ll need to provide essential details for your model setup. This includes specifying the model’s name, determining its visibility settings, and selecting the appropriate hardware configuration for your model’s execution. For instance, when working with a diffuser model, it’s common to utilise an A40 GPU for optimal performance.
2. Obtain the Stable Diffusion codebase: Replicate offers a foundational repository specifically for Stable Diffusion models. This repository comes equipped with the essential cog.yaml and predict.py files, providing a convenient starting point for your project.
git clone https://github.com/replicate/cog-stable-diffusion
cd cog-stable-diffusion
3. Tailor your model configuration: Navigate to the predict.py file and adjust the MODEL_ID parameter to incorporate an alternative pre-trained model. You have the flexibility to select any model from Hugging Face that is compatible with the diffusers library.
MODEL_ID = "prompthero/openjourney-v2"4. Acquire model weights: Execute the following command to fetch the model weights: This operation might require several minutes to complete, but it’s a one-time process.
cog run script/download-weights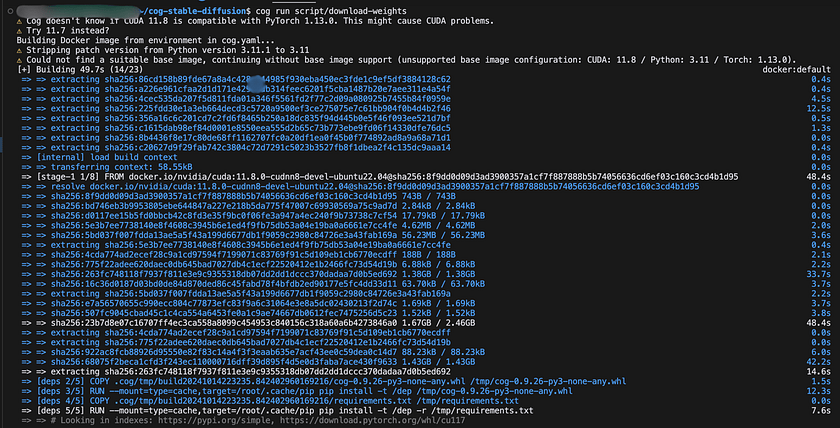
5. Upload your model to Replicate: Begin by authenticating your Replicate account:
cog loginNext, push your model to Replicate by executing the following command, making sure to substitute <your-username> and <your-model-name> with your actual Replicate username and chosen model name:
cog push r8.im/<your-username>/<your-model-name>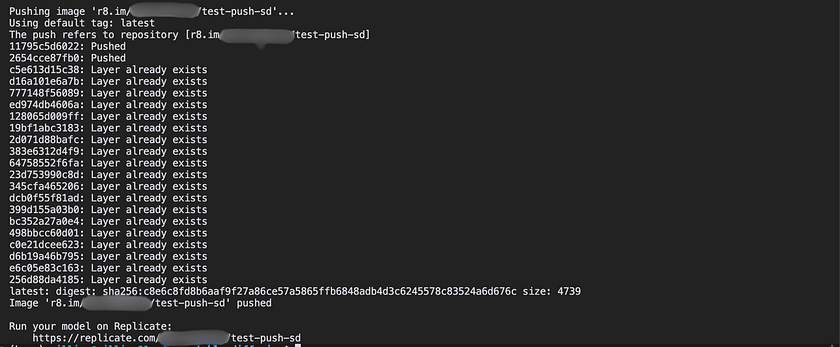
6. Use your model on Replicate: Once pushed, your model is live on Replicate! You can now:
- Run the model directly from the Replicate website using the “Playground” tab.
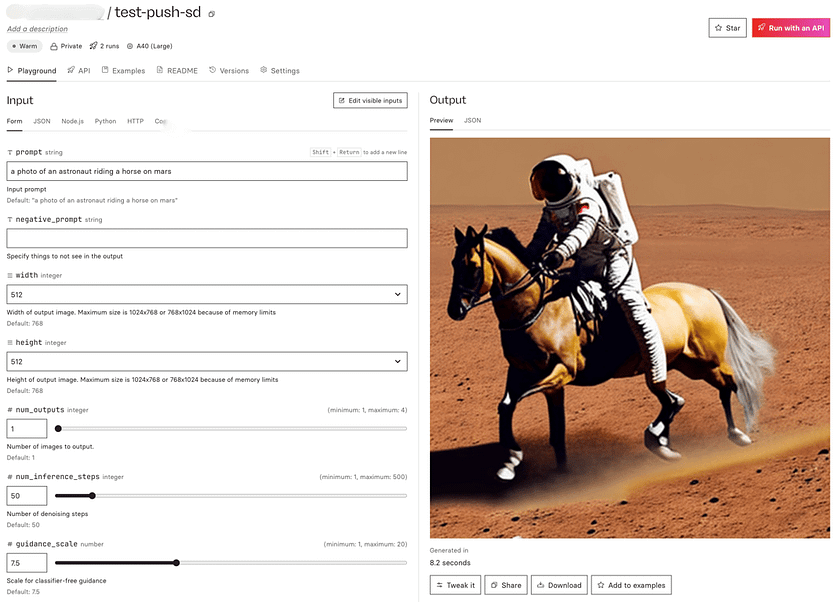
- Use the API to integrate the model into your own applications.
import replicate
    import requests
    from PIL import Image
    from io import BytesIO

    MODEL_ID = "<your-user-name>/test-push-sd:c8e6c8fd8b6aaf9f27a86ce57a5865ffb6848adb4d3c6245578c83524a6d676c"
    OUTPUT_FILENAME = "astronaut_on_mars.png"

    def generate_and_save_image():
        output = replicate.run(
            MODEL_ID,
            input={
                "width": 512,
                "height": 512,
                "prompt": "a photo of an astronaut riding a horse on mars",
                "scheduler": "DPMSolverMultistep",
                "num_outputs": 1,
                "guidance_scale": 7.5,
                "num_inference_steps": 20
            }
        )

        image_url = output[0].url
        response = requests.get(image_url)
        image = Image.open(BytesIO(response.content))
        image.save(OUTPUT_FILENAME)
        print(f"Image saved as {OUTPUT_FILENAME}")

    if __name__ == "__main__":
        generate_and_save_image()
By integrating your custom Diffusers model with Replicate, you’ve created a scalable API for your image generation model. This allows you to easily share your model with others, integrate it into various applications, and leverage Replicate’s infrastructure for handling prediction requests. The platform takes care of scaling, versioning, and providing a consistent API, allowing you to focus on improving your model and building applications around it.
Conclusion
In conclusion, Cog streamlines the process of packaging and deploying machine learning models, from local development to scalable APIs. By simplifying containerisation, prediction running, and integration with platforms like Replicate, Cog allows developers to focus on model creation rather than infrastructure. This approach accelerates the journey from development to production, enhancing collaboration and making ML models more accessible for real-world applications.
References
[1] Replicate. Push a Diffusers model. View Docs.
[2] Cog. Getting Started. View Docs.
[3] GitHub. Replicate/Cog Repository. View Repository.
Catch the latest version of this article over on Medium.com. Hit the button below to join our readers there.


